
If you are someone who is responsible for maintaining computers, it’s important that you have full control over them. It means that non-authorized persons should not be able to tamper with software, and one of the easiest ways to do this is to disable USB Ports which will make it difficult for anyone to install or run any external script on your system. If you want to do it, keep reading because we will show you how to do it. In this Vodytech Guide, you will learn how to disable USB Ports in Windows 10.
What are the Advantages & Disadvantages of Disabling USB Ports?
Before we get to our main topic, it’s important that you know the pros and cons of disabling USB ports. In this section, we will lay out the Advantages & Disadvantages of disabling USB ports. Let’s get started.
Advantages of Disabling USB Ports
- One of the biggest advantages of disabling USB port is that no one will be able to import any software or script to temper with the software of your system.
- Most viruses in computers usually come via external drives or the internet. If you disable USB Port, you will be closing one avenue of getting malicious software which will make your software safe.
Disadvantages of Disabling USB ports
- If you decide to disable USB ports, it means that you won’t be able to install any software on your system via an external source. So, you will have to download software and data via the internet on your system.
How to Disable USB Ports in Windows 10
When it comes to Disabling USB ports, there are many ways to do it, and we will share all of them with you.
How to Disable USB Ports in Windows 10 Using Registry Editor
Windows Registry is the database that contains information about all the processes in the system, and you can also use it to disable USB ports in Windows 10.
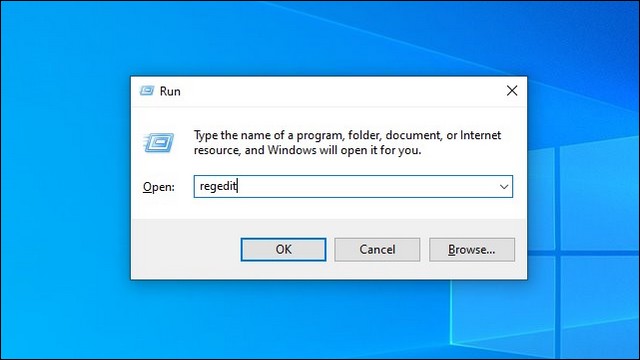
- Go to your computer and press Windows + R to open RUN on your system.
- Now type regedit and now press enter to process.
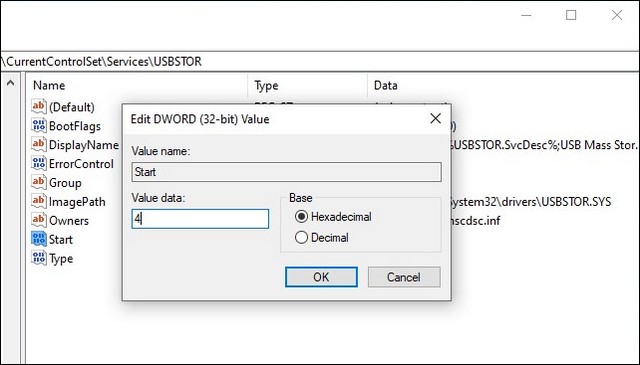
- Once Registry Editor is opened, copy and paste the following path “HKEY_LOCAL_MACHINE\SYSTEM\ CurrentControlSet\Services\USBSTOR“
- Now click on Start to open Edit “DWORD” Windows.

- Once it’s opened, change the Value data to 4 to disable USB ports. If you wish to enable USB ports in the future, change the Value data to 3.
How to Disable USB Ports in Windows 10 Using Device Manager
Device Manager is another software in Windows 10 which you can use to disable USB ports. Here’s how you can disable USB ports Using Device Manager.
- Go to your Windows 10 PC.
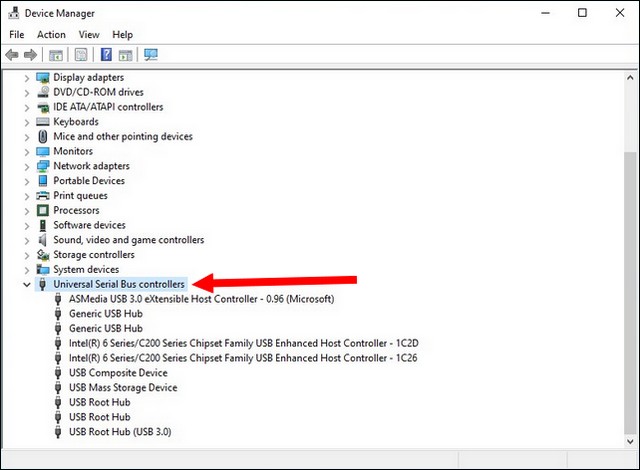
- Now press Windows + X key to open the menu and then select Device Manager from it. Alternatively, tap on the search icon and type Device Manager. Once the search results appear, find Device Manager and click it to access it.
- In the Device Manager, Find Universal Serial Bus Controllers and click it.
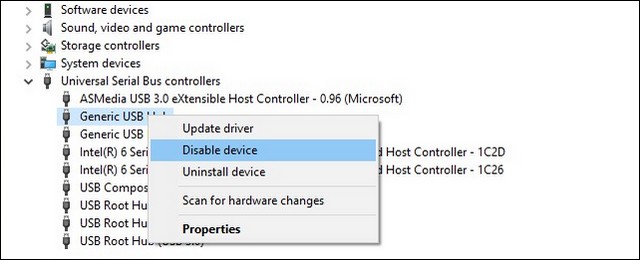
- Now find the USB Ports which you want to disable. In our case, we want to disable Intel(R) USB 3.0 ports. Right-click on the port and select Disable Device, and that’s it.
How to Disable USB Ports in Windows 10 Using USB Disabler
If you don’t want to use the above methods and want a product that can disable or enable USB ports with few clicks, you can use USB Disabler by IntelliAdmin. It’s a dedicated tool by the company which you can use to disable or enable USB Ports with a single click.

If you want to use USB Disabler, all you will have to do is to install it. Once it’s installed, open it, and you can easily enable or disable it by clicking Apply.
How to disable CD/DVD ROMs in Windows 10 Using Command Line
In the above sections, we have explained how you can use different ways to disable USB Ports. In this section, we will explain how you can disable CD/DVD ROMs as they can also be used to import software or scripts to the system. To Block CD/DVD ROMs, we will be using Command Line Tool. The best thing about this tool is that it’s a very effective tool, and you can get it done with few steps. All you will have to do is to run the following command in the command prompt, and CD/DVD ROMs will be disabled.
reg add HKLM\System\CurrentControlSet\Services\cdrom /t REG_DWORD /v “Start” /d 4 /f
Once the command is completed, CD/DVD ROMs will be disabled. If you wish to enable them again in the future, you can use the following command.
reg add HKLM\System\CurrentControlSet\Services\cdrom /t REG_DWORD /v “Start” /d 1 /f
It’s also important to note here that command prompt is a very sensitive tool, and if you run any other command, it can affect your computer. So, make sure that only use it to run the above command and once you are done, close it.
FAQ
Why I’m unable to Disable USB Ports on my Windows 10?
If you wish to disable USB Ports on Windows 10, make sure that you have administrative access to the computer.
Can I connect the hard drive with Computer if USB ports are disabled?
No, if USB Ports are disabled on your computer, you can’t connect any Hard Drive or USB with your system. The only way to proceed is if you enable USB ports on your Windows.
How do I know if my USB Port is disabled?
The easiest way to find it out is to insert a USB device into the system. If the system picks up the device, it means that USB ports are enabled. Similarly, if the system doesn’t pick up the device, it means that USB Ports are disabled.
Conclusion
In this guide, you learned how to disable USB ports in Windows 10. We shared multiple ways to do it, and you can pick the one which suits you. We have also explained how you can disable CD/DVD ROMs as they can also be used to import software or script to the system. If you have any questions, please let us know in the comments. Also, check this guide where we have shared the Best Registry Cleaners for Windows 10.


