Windows 11 comes with a range of new features and improvements, one of which is the ability to create virtual desktops. Virtual desktops allow you to have multiple desktops on a single screen, which can be useful if you need to separate your work or projects into different areas. In this article, we’ll show you how to create virtual desktops in Windows 11.
Create a virtual desktop on Windows 11
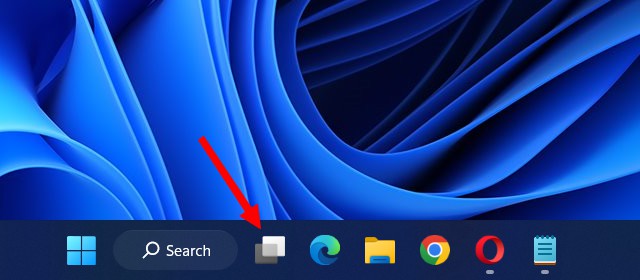
To create a virtual desktop, you’ll need to open Task View. You can do this by clicking the Task View button on the taskbar, or by pressing the Windows key + Tab on your keyboard.
Once you’re in Task View, you’ll see all of your currently open windows. To create a new virtual desktop, click on the New desktop button located in the top left corner of the screen. Alternatively, you can also use the keyboard shortcut Windows key + Ctrl + D to create a new desktop.
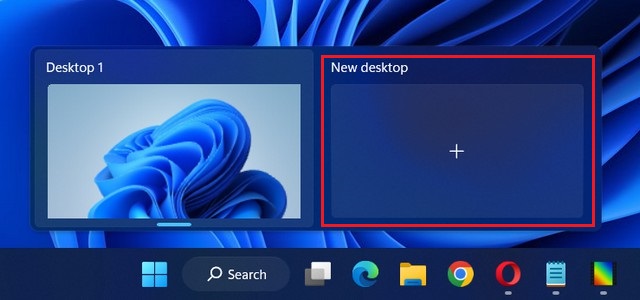
You can now use virtual desktops in Windows 11 to organize your open windows and multitask more efficiently. That’s it!
You can switch between your virtual desktops by clicking on the Task View button on the taskbar and then selecting the desktop you want to switch to. You can also use the keyboard shortcut Windows key + Ctrl + Left or Windows key + Ctrl + Right to switch between desktops.
Move app to another virtual desktop on Windows 11
To move an app to another virtual desktop on Windows 11, follow these steps:
1. Open the Task View by clicking on the Task View button on the taskbar or by pressing the Windows key + Tab.
2. Locate the virtual desktop where the app is currently located.
3. Right-click the app and select the Move to option.
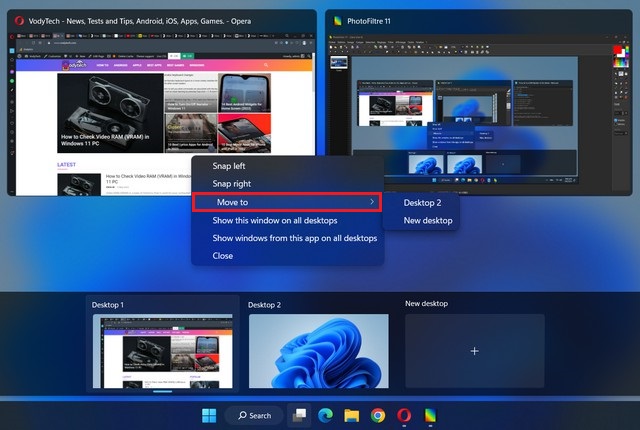
4. Once you’re on the new virtual desktop, you should see the app you moved earlier on the taskbar. Click on the app to launch it.
That’s it! You’ve successfully moved an app to another virtual desktop on Windows 11.
Rename virtual desktop on Windows 11
To rename a virtual desktop on Windows 11, you can follow these steps:
1. Open the Task View by pressing the Windows key + Tab or clicking on the Task View icon on the taskbar.
2. Right-click on the virtual desktop you want to rename.
3. Click on Rename from the context menu that appears.
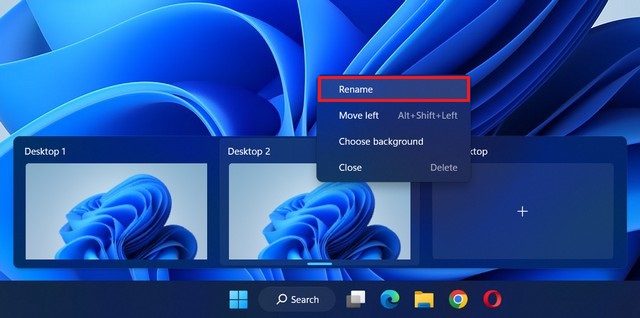
4. Type in the new name for the desktop and press Enter.
The virtual desktop will now have the new name you entered. Repeat these steps for any other virtual desktops you want to rename.
Change the background image of a virtual desktop
To change the background image of a virtual desktop on Windows 11, you can follow these steps:
1. Right-click on the desktop and select Change background option.
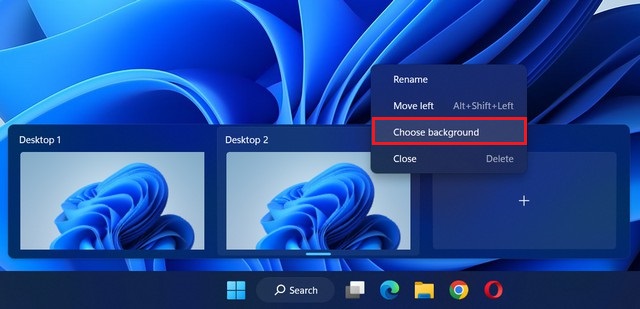
2. In the Personalization settings, click on Background in the left sidebar.
3. Choose the type of background you want to use from the available options, including Picture, Solid color, and Slideshow.
4. If you choose “Picture”, click on the Browse photos button to select an image from your computer.
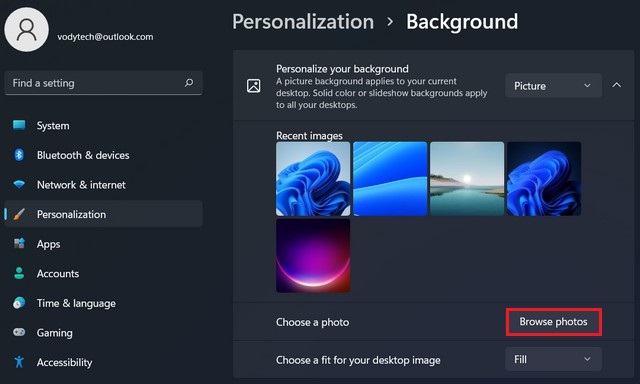
Once you have selected your background image or color, close the Personalization settings window to apply the changes.
Your virtual desktop’s background image should now be changed to the one you selected.
Close virtual desktop on Windows 11
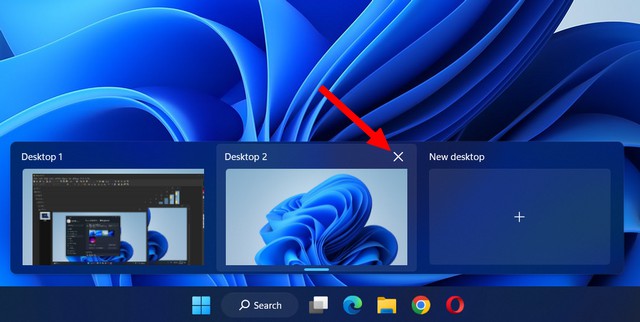
To close a virtual desktop, click on the Task View button on the taskbar and then hover your mouse over the desktop you want to close. Click on the “X” button that appears in the top right corner of the desktop thumbnail to close it. Alternatively, you can also use the keyboard shortcut Windows key + Ctrl + F4 to close the current desktop.
Virtual desktops can be a great way to organize your work and improve your productivity. With Windows 11, creating virtual desktops is easier than ever before. Follow the steps outlined in this article to create and manage virtual desktops on your Windows 11 PC. If you have any questions or suggestions, please let us know in the comments section. Also, check this guide where you will learn How to change theme on Windows 11.


