
In this guide, you will learn how to use night mode filter on Galaxy Note 9. Galaxy Note 9 is a premium smartphone by Samsung and it comes with a tall display which looks awesome. However, if you have the habit of using the smartphone in the night then it can affect your eyes which is not a good thing but you can enable the Night Mode which will relieve your eyes. Also according to many studies, it is proven that smartphone screens cause the eye strain and screen’s blue light stimulates the brain and reduce melatonin. You can avoid these issues by using the Night mode and here’s how you can do it.
SEE ALSO: How to Disable the Galaxy Note 9 Always On Display
How to Enable Night Mode Filter on Galaxy Note 9
When it comes to enabling the Night Mode, you can do it in a couple of ways. The first way is to swipe down from the top of the screen and expand the view. In these icons, find the “Blue light filter” icon and tap it, which will enable the Night Mode and you can use this method to quickly turn on and off Night Mode. However, if you want to customize the Night Mode then you will need to follow these instructions.
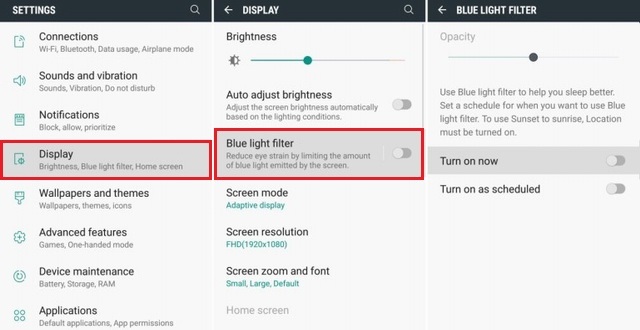
- Swipe down from the top of the screen and tap the gear-shaped icon in the top right corner to access the settings.
- Find the Display section and tap it.
- Here find and tap the Blue light filter and tun it on. You can adjust the filter intensity according to your comfort level.
In this way, you can enable and customize the Night Mode. As soon as you will on it, you will see the significant change in the display and the screen will start looking yellowish. You will need some time to get used to it, but after sometime you will start loving it as using Note 9 with night mode will now not cause eye strain.
Conclusion
Similarly, if you want you can also schedule the night mode which will automatically enable the Night mode according to set time. You can do it by following the above mention steps, this time go to Blue Light Filter and tap the “Turn on as scheduled” and in this section set the time when you want to enable it. If you have any questions, please let us know in the comment section below. Also, visit our website for more useful guides.


